# Platform usage
The movisensXS platform (opens new window) gives each user the possibility to take different actions. However, if one is an admin within their organization, there are more actions to take. Thus, we difference between users with and users without admin rights.
We recommend to use the movisensXS platform (opens new window) with the latest Google Chrome or Mozilla Firefox version on a desktop device.
# Registration
If you're completely new to movisensXS, you'll want to create an account for your organization.

The account should be created by the future administrator. Further users can be invited to each account by the administrator, who can participate in the creation and implementation of studies (not to be confused with volunteers. The how-to is described below).
If your organization already has an account and you want to join them, please ask an admin of that organization to invite you (via the "+ Add New User"-button).

Please note that a user is identified by their e-mail-address. An e-mail-address can only be used once for the movisensXS-platform.
Please note the rules for you account-password, no matter if you want to create an account for your organization or if you have been invited to an organization:
- at least 8 characters length and maximum 64 characters length,
- at least 1 upper case letter,
- at least 1 lower case letter,
- at least 1 special character
WARNING
When trying to log into your account and entering the wrong password too many times you will be prevented to log into movisensXS for a certain amount of time. For any problems please contact our support.
# Studies
[X] User with admin rights
[X] User without admin rights
When you login or when you click on the studies tab, the page you will see is a list of the studies your user has access to. By clicking on one of the studies, you directly get to the studies dashboard.
# Dashboard
The dashboard of the study you chose will show you the ideal order to use movisensXS.

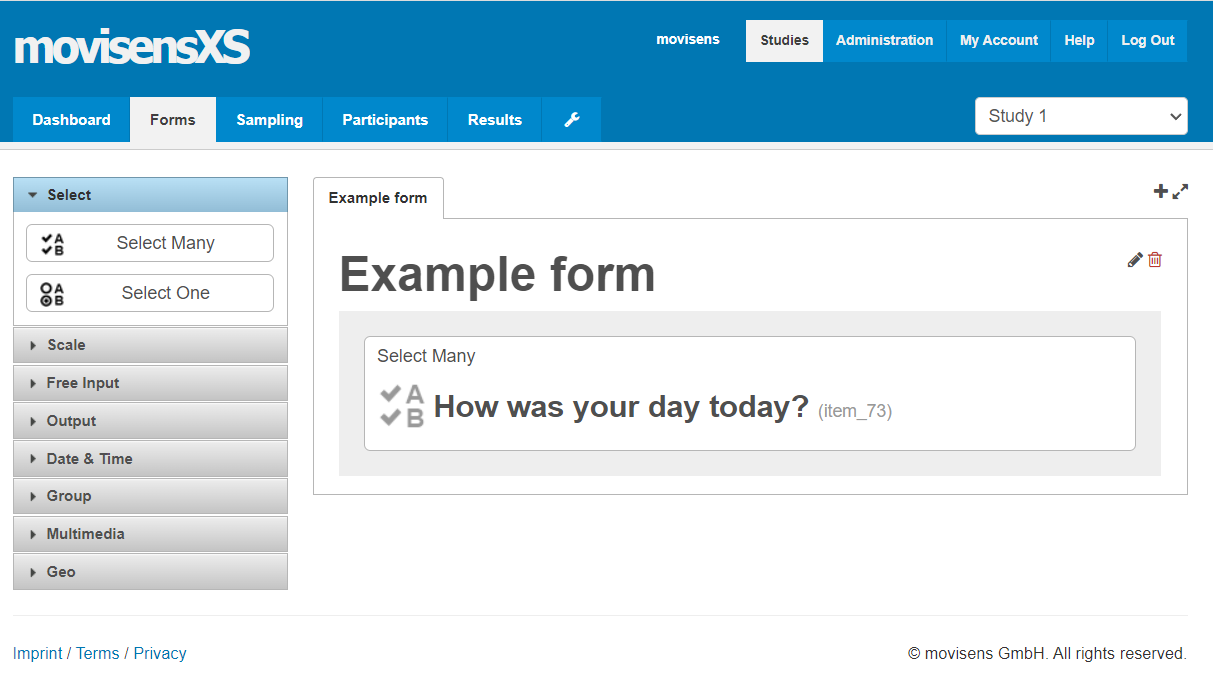
# Forms
On this page you can access the forms of a study. If you have writing rights, you can change the forms here (see chapter Forms (opens new window)). If you have only reading access, you cannot change those forms.
# Sampling
Here the sampling of the study can be found and changed (see chapter Sampling (opens new window)). If you have only reading access, you cannot change the sampling.

# Participants
The participants of the study can be administrated here.
You can add participants by clicking the "Add Participant"-button.
If some participants should take part in the study in a specific time range, you can add a start date and an end date, so that the participant will automatically have acces at the the given time.
In order to couple a participant, click on the QR-code icon and let the participant scan the QR-code with their movisensXS-App. If the participant is not nearby, you can also click on the link provided below the QR-code and send that link to the participant.
If the participant has uploaded results, you can download the results of only that one participant by clicking on the download-icon in the column "Download Results" and select the format you want.
Delete a participant by clicking on the trash bin icon to the right of the participant that should be deleted, type the confirmation message into the dialog that's popping up afterwards and click on the "delete"-button.

# Results
Here some statistics of the study are shown and also all results of a study can be downloaded here. You can choose between different formats, depending on the data that is uploaded.

# File Formats of the Results
# Questionnaire Results
The questionnaire results can be downloaded in different formats:
- Excel 2007 (XLSX): Default option when downloading results.
- Comma-separated values (CSV): CSV for regions where the decimal separator is a '.'.
- Semicolon-separated values (CSV): CSV for regions where the decimal separator is a ','.
- Multimedia Results (ZIP): Contains all captured multimedia files in a ZIP.
The questionnaire results contain the following columns:
- Participant: The participant id.
- Trigger: The name of the trigger that lead to the execution of this form.
- Trigger_date & Trigger_time: The time when the trigger occured that lead to the execution of this form (in the time zone of the smartphone).
- Trigger_counter: This counter is incremented each time a trigger (yellow block in the sampling) is executed. Each time e.g. a "Random Time" or a "Button pressed" is executed the trigger counter increments. If multiple forms are placed after one another (e.g. after a "Button pressed" trigger), than the "Trigger Counter" has the same number for all these consecutive forms.
- Form: The name of the form as specified in the movisensXS web console.
- Form_start_date & Form_start_time: The form start time (in the time zone of the smartphone).
- Form_finish_date & Form_finish_time: The form finish time (in the time zone of the smartphone).
- Form_upload_date & Form_upload_time: The upload time (in Central European (Summer) time which is UTC/GMT +2 hours in winter or UTC/GMT +1 hours in winter. The current time zone can be found here (opens new window).
- Missing: If this column is not empty than this form is missing and the column describes the reason. (Ignored = Participant did not respond to the alarm, Dismissed = Participant dismissed the alarm, Incomplete = Participant did not complete the form, Canceled_by_new_alarm = A new alarm canceled the previous alarm)
- 1-n Columns for each item: For each answer option of a Select Many Item a column is created with the label and the answer option. 0 indicates not selected, 1 indicates selected.
All dates and times are stored in the local time zone of the smartphone except the Form_upload_date/time.
# Mobile Sensing Results
- Unisens Log File (ZIP): If you are using logging features (beta), the files are logged in the unisens file format. You can view it with the UnisensViewer or use the provided libraries.
- Unisens Log File in minutes (XLSX): This Excel file tries to
aggregate the logged data.
WARNING
This file does not contain all data and is only intended for an overview! Use the Unisens Log File (ZIP) for data analysis.
- Track as Google Earth File (KMZ): If you are using the location
tracking feature (beta) you can use this file to get an overview
over the track of the participant. Only location data with an
accuracy better than 100m is included. The KMZ file contains the
location data and can be opened with tools like Google
Earth (opens new window) or online with the GPS
Visualizer (opens new window). You can also use Google
Earth to show the Elevation
Profile (opens new window) of the
track.
WARNING
This file does not contain all data and is only intended for an overview! Use the Unisens Log File (ZIP) for data analysis.
# Configuration
The tab with a screwdriver is the configuration tab for the specific study. You can change the study's name and also the library version, but we recommend to only do so when our support tells you to.
Additionally you can type your informed consent in the textfield and choose, if the participant should only read it or also if they should sign it with their signature.

# Administration
[X] User with admin rights
[] User without admin rights
# Access
The access-tab makes it possible for users with admin rights to manage the users of your organization.
You can add a new user by clicking the "Add new User"-button, typing in the e-mail-address and name of the new user, and clicking "save changes". The user is only finally registered, if they used their link in the e-mail they receive with this invitation.
All users can be given or taken admin-rights as well as reading or writing access to all the different studies within your organization. In order to give a user writing/reading or no access, click on the icon beneath the study they should have access to in the row of the user that should have the access. The pen-icon means, they have writing access, the eye-icon means they have reading only access and the lock-icon means that the user cannot access the study.
Delete a user by clicking on the trash bin icon to the right of the participant that should be deleted, type the confirmation message into the dialog that's popping up afterwards and click on the "delete"-button.

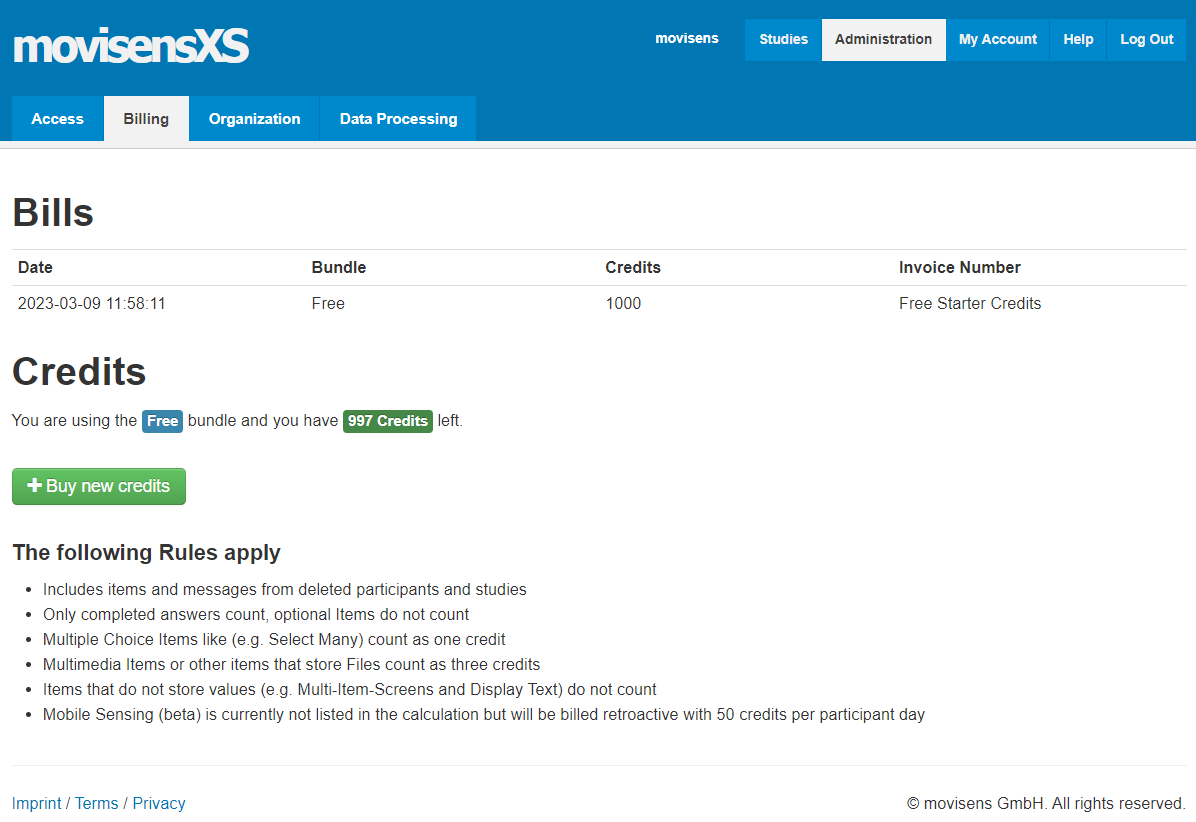
# Billing
You can see the bills of the organization in the billing-tab. You can also reach the different products and choose a new bundle by clicking on the "Buy new credits"-button.
It is also explained what is included in the credits and how much it costs.
# Organization
The organization-tab lets you change the name of your organization. If you want you can also include the address, but that is not neccessary. If you decide to include the address, please beware that there can only be 255 characters saved, else you'll run into an error.
In case you already signed a DPA, you are not able to change the name of the organization. When that is the case, movisensXS shows you a message that tells you the next steps in order to change the name.

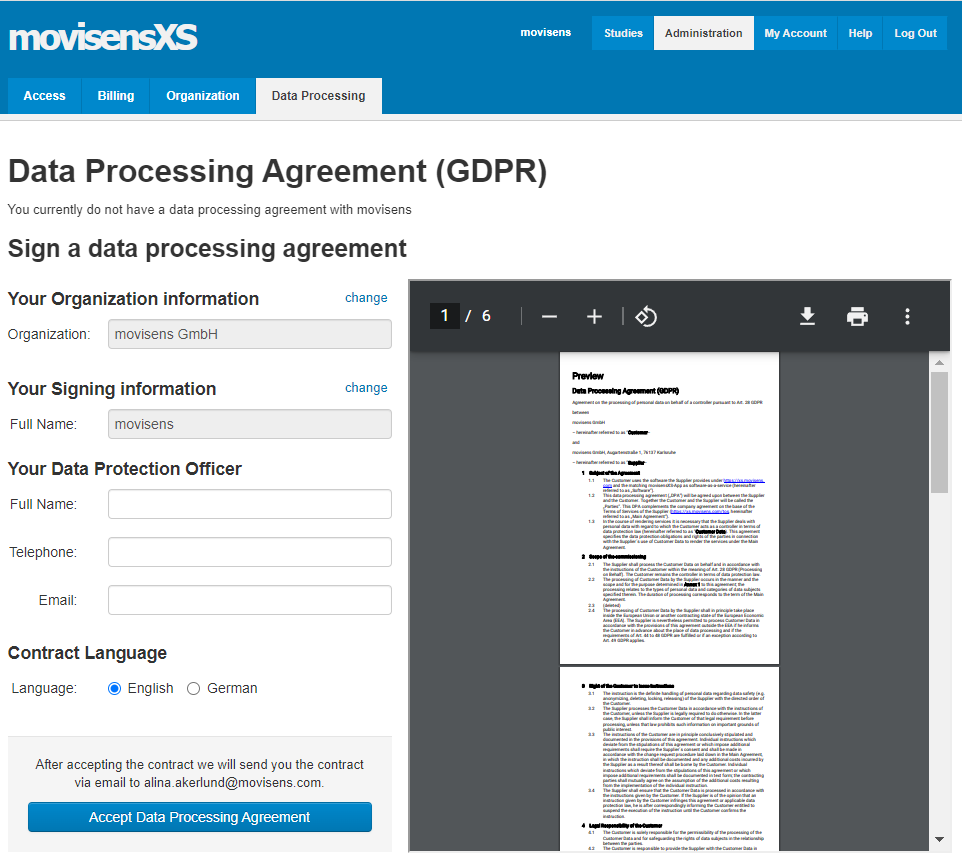
# Data Processing
On this page you have to sign a Data Processing Agreement (GDPR) and see and download the ones that have been signed before. To sign a DPA, your full name, telephone number and e-mail-address is needed. The rest of the information is automatically included through your account. Your can also preview the DPA with the viewer on the right of the page. At last, choose the contract language and click on "Accept Data Processing Agreement".
# [Administration] Danger Zone
If you want to delete the whole organization you can do this on this page. Here you'll delete not only your account, but all accounts connected to the organization and also all studies, their results and data will be deleted. The deletion of the studies, their data and the organization can be undone for 30 days after deletion but user accounts cannot be restored.
To delete the organization, click the red "delete"-button and click on the link that is sent to you. All other administrators within the organization will also receive an e-mail with a notification about the process being started.

# My Account
[X] User with admin rights
[X] User without admin rights
# Personal Data
You can change your name and e-mail in case you didn't sign a DPA with your account yet.
In case you signed a DPA already, you'll need to contact the movisens-support. Keep in mind to sign a new DPA after you let your data changed.

# Change Password
To change the password to your personal account, just insert the same password in both text fields and click "Change Password". You'll get feedback by a little notification in the upper right corner of your browser that will be saying if the change was successfull or needs to be repeated.

# Mail Notification
Here you can opt-out to receive a mail notification if the participant writes a message.

# [My Account] Danger Zone
You can delete your user account on this page. In case you are an administrator of your organization, you'll need to ask someone with administration rights to take yours away. Else you'll see this screen and won't be able to delete your account:

As a user without administration rights you just need to click the "delete"-button and confirm your action. Note that your account can't be restored but your e-mail can be used for another movisensXS-account immediately.

This action will only delete your user account and not influence the organization or other users within.
# Help
[X] User with admin rights
[X] User without admin rights
Clicking on the help button will redirect you to our movisens Docs (opens new window).